

A stud-mounted floating shelf sized an appropriate depth and length for the shelf, with the lowest shelf sitting a comfortable height above your counter, gives you a safe, functional coffee station. That’s the short answer. The working zone should fall 36–42 inches from the floor, shelves spaced 12–16 inches apart, and the whole thing anchored into studs using a hidden-bracket system. According to Shelfology’s guide to floating shelves, a properly stud-mounted system supports roughly 25–50 pounds per stud — enough for mugs, canisters, and a small grinder, but only when you’ve confirmed the manufacturer’s weight rating first. Before you drill a single hole, locate every stud, verify that rating, and plan a load test before daily use.
Table of Contents
- What do you need to install a floating shelf coffee station?
- How do you plan the right shelf height and depth for your space?
- Which mounting method should you use for a coffee station shelf?
- Step-by-step: how to mount a hidden-bracket floating shelf
- Where should the coffee maker go, and how do you manage cords?
- How do you test load capacity and keep the shelf safe long-term?
- Key Takeaways
- The shelf is the easy part
- What to stock on your new coffee station
What do you need to install a floating shelf coffee station?
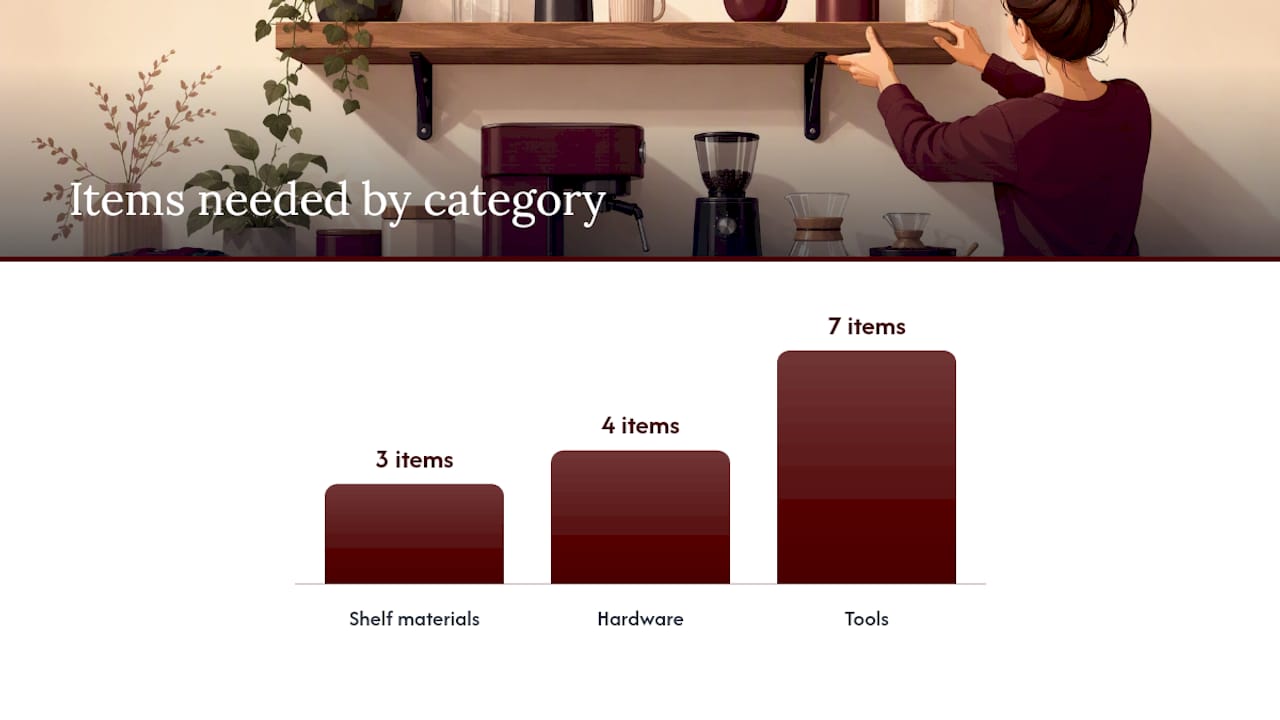
Gathering everything before you start saves two trips to the hardware store. Here’s what the job actually requires.
Shelf materials:
- Solid wood planks (walnut, oak, or pine) offer the best durability and take stain well
- Plywood with veneer gives clean lines at a lower cost and resists warping better than solid wood in humid kitchens
- Prefinished floating-shelf kits from brands like IKEA BERGSHULT or similar include brackets and are sized for quick installs
Hardware:
- Stud-mounted hidden brackets (rod-style or plate-style)
- Heavy-duty lag screws, typically 3–3.5 inches long for stud penetration
- Toggle anchors (Toggler SNAPTOGGLE or similar) for non-stud scenarios only
- Wood screws for securing the shelf to brackets
Tools:
- Stud finder (magnetic or electronic)
- 4-foot level
- Drill with wood and masonry bits
- Impact driver
- Measuring tape and pencil
- Painter’s tape
Pro Tip: *Before drilling, press painter’s tape over each marked location. It gives you a clean surface to write measurements on, reduces tear-out on painted walls, and lets you
before committing.*
Keep your BLUF measurements handy: an optimal shelf depth for mugs or machines, a suitable length to match your counter, and adequate clearance above the counter. The Frugal Homemaker’s DIY farmhouse coffee bar is a solid reference for how pipe brackets and stained 2x8 boards come together affordably.
How do you plan the right shelf height and depth for your space?
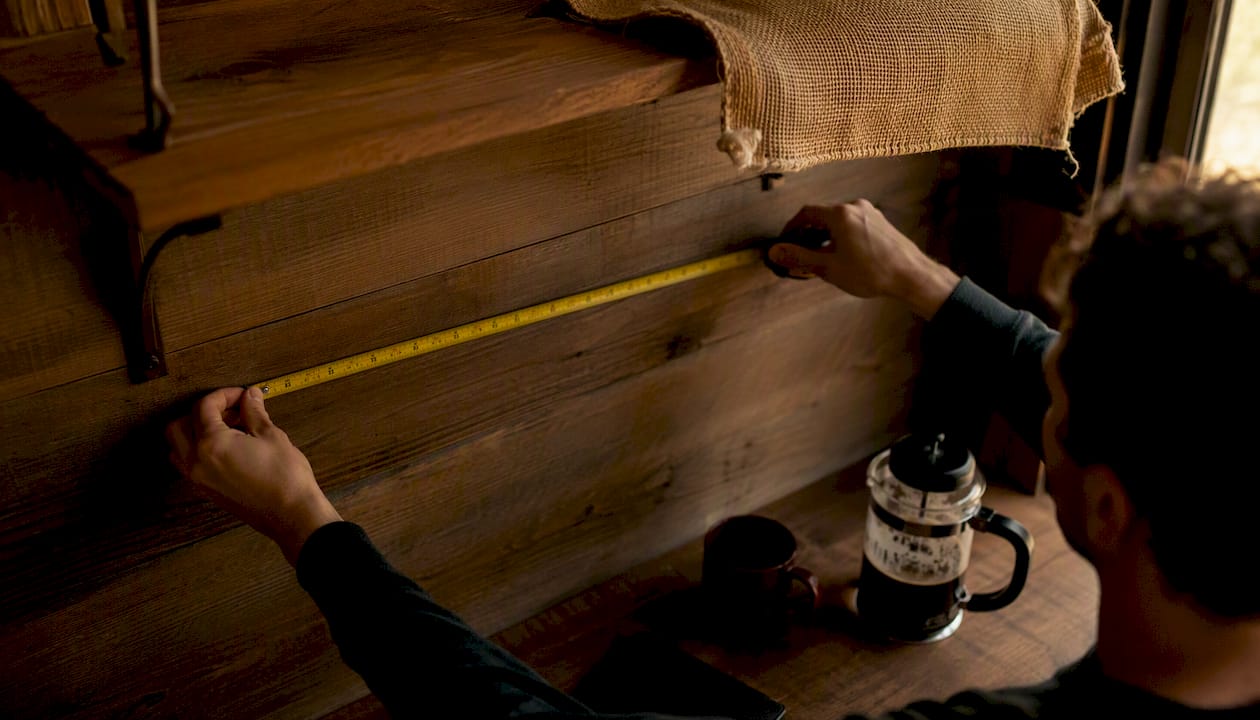
Measure before you buy anything. The most common mistake is mounting a shelf that looks right but blocks the coffee maker lid or puts mugs out of comfortable reach.
| Measurement | Standard Range | Notes |
|---|---|---|
| Shelf depth | 8–10 in | Mugs, canisters, small accessories |
| Shelf depth (machine) | 12 in | Small coffee maker placed directly on shelf |
| Shelf length | 36–48 in | Match to counter width |
| Working zone height | 36–42 in from floor | Primary reach zone |
| Shelf-to-counter clearance | 18–24 in | Machine lid and French press clearance |
| Inter-shelf spacing | 12–16 in | Tall mugs, pour-over kettles |
AshDeco’s kitchen shelf spacing guide confirms that a bottom shelf placed less than 18 inches above the counter will interfere with most drip machines and French presses. That’s a remount you don’t want.
For depth, ShelfExpression’s floating shelf depth guide recommends 8–10 inches for display and mug storage, stepping up to 12 inches when a small appliance lives on the shelf. Match your shelf length to the counter below it — a 36-inch shelf over a 48-inch counter looks undersized.
Pro Tip: Tape a piece of cardboard cut to your planned shelf dimensions onto the wall at the target height. Live with it for a day. You’ll immediately notice if it blocks a cabinet door, a light switch, or your line of sight.
Check for obstructions: cabinet swing radius, outlet placement, trim molding, and any light switches within 6 inches of the planned bracket locations.
Which mounting method should you use for a coffee station shelf?
The method you choose determines both how the shelf looks and how much weight it can safely hold.
| Method | Visual Result | Typical Load Range | Difficulty |
|---|---|---|---|
| Stud-mounted hidden brackets | Clean, floating look | 25–50 pounds per stud | Moderate |
| Surface-mounted heavy-duty brackets | Visible hardware | Higher with proper brackets | Easy |
| Toggle anchors (no stud) | Clean look | Lower; varies by anchor | Moderate |
| Cleat system | Minimal hardware visible | Spreads load across wall | Moderate–High |
Stud-mounted hidden brackets are the right call for a coffee station. The floating look suits the aesthetic, and anchoring into framing gives you the load capacity for ceramic mugs and full canisters. Surface-mounted brackets are faster to install and can handle more weight with the right hardware, but the visible metal arms don’t suit every kitchen style.
Toggle anchors work in a pinch for lighter loads, but drywall anchors alone are often insufficient for dense ceramic mugs and bean canisters — a point Shelfology’s guide makes clearly. If you can’t hit a stud, a cleat system that spans multiple fastener points is a safer alternative than a single toggle.
Always confirm the product spec. A bracket rated for 50 lb total is not the same as one rated for 50 lb per stud.
Step-by-step: how to mount a hidden-bracket floating shelf
This process covers a standard stud-mounted install, the most reliable approach for a DIY coffee bar floating shelf.
Safety check: Before drilling, use a stud finder’s AC detection mode or a wire detector to confirm no electrical wiring or plumbing runs through the drill path. Wear eye protection throughout.
- Secure and check. Drive trim screws through any provided holes on the underside. Grip the shelf at its outer edge and apply firm downward pressure. No movement means a solid install. See Coffee Aesthetic’s floating shelf guide for a visual walkthrough of this bracket-to-shelf sequence.
Where should the coffee maker go, and how do you manage cords?
Place the coffee maker on the counter, not the shelf, unless the shelf is explicitly rated for the machine’s weight and the depth is at least 12 inches. Most drip machines and espresso makers also need top clearance for water reservoirs — that 18–24 inch shelf-to-counter gap exists for exactly this reason.
Appliance and cord checklist:
- Confirm an outlet is within 18 inches of the machine’s planned position before mounting anything
- Use cable clips or a slim cord raceway (Wiremold makes good ones) to route cords along the wall or under the shelf
- Never run a cord across a cooking surface or through a cabinet hinge gap
- A short 1–2 foot extension cord routed cleanly beats a long cord draped across the counter
Mug storage options:
- Under-shelf hooks (cup hooks or J-hooks) screwed directly into the shelf’s underside — fast, cheap, and effective
- A hanging mug rack mounted below the lowest shelf
- Peg-style solutions that let you reconfigure spacing for different mug sizes
Distribute mug weight evenly across the shelf length rather than clustering all mugs at one end. For compact setups, a kitchen storage organizer with drawer compartments keeps pods and accessories off the shelf surface entirely, freeing space for display items.
How do you test load capacity and keep the shelf safe long-term?
Load test protocol:
Start with the lightest items you plan to store — two or three mugs. Leave them for 24 hours and check for any sag or bracket movement. Add canisters and accessories incrementally over the next 48 hours. Re-tighten all lag screws and trim screws after the first full load cycle.
Maintenance checklist (every 6–12 months):
- Inspect brackets for any visible gap between the bracket plate and the wall
- Check lag screws for loosening — a quarter-turn tightening is normal in the first year
- Look for moisture damage or discoloration on the shelf surface near the wall
- Clean wood finishes with a damp cloth and a mild wood cleaner; avoid soaking the surface
Safety rules that matter:
- Never exceed the manufacturer’s stated weight rating, even if the shelf feels solid
- Distribute heavy items (full bean canisters, ceramic mugs) directly over stud locations
- Replace any anchor that shows cracking, bending, or pull-through immediately
This article provides general installation guidance. Always confirm weight ratings and structural requirements with the manufacturer’s specifications and, for masonry or load-bearing walls, consult a qualified contractor.
Key Takeaways
A stud-mounted hidden-bracket system sized an appropriate depth and length for the shelf, with the lowest shelf 18–24 inches above the counter, is the safest and most functional floating shelf coffee station setup.
| Point | Details |
|---|---|
| Shelf depth and length | Use 8–10 in for mugs and canisters; 12 in if a machine sits on the shelf; 36–48 in length to match counter proportion. |
| Working height and clearance | Primary zone: 36–42 in from the floor; lowest shelf 18–24 in above counter; 12–16 in between shelves. |
| Mounting and load capacity | Stud-mounted hidden brackets support 25–50 pounds per stud; always verify the manufacturer’s weight rating before loading. |
| Safety and load testing | Add weight incrementally over 48 hours and re-tighten all fasteners after the first full load cycle. |
| Espritkaffe recommendation | Stock your new station with Espritkaffe’s freshly roasted beans — the ritual deserves the right coffee. |
The shelf is the easy part
Most DIY floating shelf guides focus almost entirely on the install — stud spacing, lag screw depth, bracket type. That’s all necessary. But the decision that actually shapes your morning isn’t the bracket you chose; it’s whether the shelf is positioned so the ritual feels effortless.
A shelf mounted 2 inches too low means you’re hunching over the machine every morning. One mounted 4 inches too high means reaching past eye level for a mug before you’re fully awake. Neither is a structural failure, but both quietly erode the experience. The measurements in this guide aren’t arbitrary — they’re the difference between a coffee station you use and one you tolerate.
The styling side gets underestimated too. People spend real money on beans and equipment, then store everything in mismatched containers on a shelf that fights the rest of the room. A single consistent wood tone, one metal finish, and deliberate negative space between groupings costs nothing extra and changes how the whole corner reads. Espritkaffe’s approach to pairing coffee ritual with daily routines makes this point well — the physical setup and the coffee itself should reinforce each other.
Build the shelf right. Then stock it intentionally.
What to stock on your new coffee station

The shelf is up. Now fill it with something worth the effort. Espritkaffe roasts to order — light, medium, and dark, by origin or blend — so every bag on your station is fresh, not sitting in a warehouse. The Coffee with Mushrooms Medium Roast is a strong first choice for a home station: smooth enough for daily use, functional enough to feel intentional. For a broader starting assortment, the full coffee collection covers every roast profile. All Espritkaffe beans are certified free of mycotoxins, heavy metals, mold, and yeast — which matters more when you’re drinking two cups before 8 AM. Browse the collection and place your first order today.